Welcome to part 2 of our tutorial which demonstrates how to craft an AI powered web application. In Part 1 we showed you how to set up NodeJS with Express. For this next section we will outline the process of integrating three JavaScript AI libraries that will enable you to add stunning AI functionality to your app.
These libraries, built on GPT OpenAI technology, empower you to enhance the functionality of your applications by enabling quick answer responses to user queries, providing real-time translation, and allowing users to rephrase chat messages to modify their tone. You can read more about these AI features here:
AI Answer Assist
AI Translate
AI Rephrase
Our goal at QuickBlox is to expand developers’ capabilities by simplifying the integration of artificial intelligence into their applications. We hope you find this tutorial helpful!
Integrating QuickBlox AI JavaScript Libraries
Don’t forget to read Part 1 of this tutorial first. Now that you’ve set up NodeJS with Express, let’s dive into the exciting process of integrating QuickBlox AI JavaScript libraries into our application. We’ll be working with three key libraries:
qb-ai-answer-assistant
qb-ai-translate
qb-ai-rephrase
These libraries provide powerful AI capabilities to enhance communication in your application. Before we proceed, make sure you have Node.js and npm installed in your project.
Step 1: Install QuickBlox AI Libraries
Run the following commands in your terminal to install the required QuickBlox AI libraries:
npm install qb-ai-answer-assistant qb-ai-translate qb-ai-rephrase --save
This will add the libraries as dependencies in your package.json file.
Step 2: Read Documentation
QuickBlox provides detailed documentation on how to use each library as a standalone feature. Refer to the official documentation for each library:
QuickBlox Answer Assistant Documentation
QuickBlox Translate Documentation
QuickBlox Rephrase Documentation
Understanding the documentation will provide you with insights on how to leverage the capabilities of each library in your application.
Step 3: Integrate QuickBlox AI Answer Assist
Update your controller file (assistController.js) to incorporate QuickBlox AI Answer Assist functionality.
Here’s a simplified example of integrating Answer Assistant in assistController.js:
// assistController.js
const QBAIAnswerAssistant = require('qb-ai-answer-assistant').QBAIAnswerAssistant;

history = [
    { role: "user", content: "Good afternoon. Do you like football?" },
    { role: "assistant", content: "Hello. I've been playing football all my life." },
    { role: "user", content: "Can you please explain the rules of playing football?"}
];
textToAssist = "Can you please explain the rules of playing football?";

module.exports.showFormAssist = async function (req, res) {
      try {
     const settings = QBAIAnswerAssistant.createDefaultAIAnswerAssistantSettings();
     settings.apiKey = 'YOUR_API_KEY';
     settings.model = 'gpt-3.5-turbo';
     settings.maxTokens = 3584;

            const result =
         await QBAIAnswerAssistant.createAnswer(req.body.text, history, settings);

            res.render('assist', {
                     title: 'AI Assist',
                     isAssist: true,
                     history: JSON.stringify(history, null, 4),
                     textToAssist,
                     result
            });
    } catch (e) {
        res.render('assist', {
            title: 'AI Assist',
            isAssist: true,
            history: JSON.stringify(history, null, 4),
            textToAssist,
            result: 'Error assist'
        });
    }
}

module.exports.showFormAssist = async function (req, res) {
    res.render('assist', {
        title: 'AI Assist',
        isAssist: true,
        history: JSON.stringify(history, null, 4),
        textToAssist,
    });
}
This code snippet demonstrates the integration of the qb-ai-answer-assistant library into the assistController.js file. The library is designed to facilitate interaction with QuickBlox’s Answer Assistant AI feature.
Explanation:
- Import the QBAIAnswerAssistant class from the library.
- Define a sample conversation history and text for the AI to assist.
- In the showFormAssist function, set up the default AI Answer Assistant settings, including your API key, model, and maximum tokens.
- Call the createAnswer method with the user input, conversation history, and settings to generate an AI response.
- Render the assist view with the conversation history, user input, and AI-generated result.
- Handle errors gracefully and render the assist view with an error message if an exception occurs.
- The second showFormAssist function renders the initial assist view with the conversation history.
Make sure to replace ‘YOUR_API_KEY’ with your actual OpenAI API key. This integration allows your application to benefit from the AI Answer Assistant capabilities seamlessly.
We must update the view in file assist.hbs. This view incorporates the changes in the markup to display the AI Assistant functionality seamlessly:
  <h3>{{title}}</h3>
  <hr>
  <div id="ai-assist" style="height: 300px; width: 600px;">
      <form action="/ai-assist" method="post">
          <div style="width: 400px; font-family: monospace; font-size: xx-small;">
              <div class="row">
                  <div class="col">
                      <div class="card blue-grey darken-1">
                          <div class="card-content white-text">
                              <span class="card-title">History:   </span>
                              <p>
                              <pre>{{history}}  </pre>
                              </p>
                          </div>
                      </div>
                  </div>
              </div>
          </div>

          <div class="input-field col s12">

              <div class="row">
                  <div class="input-field col s12">
                      <textarea id="text" name="text" class="materialize-textarea" required>{{textToAssist}}  </textarea>
                      <label for="text">Text to answer assistant:  </label>
                  </div>
              </div>

              <div>
                  <button class="btn waves-effect waves-light" type="submit" name="action" value="assist" id="submit">
                    Answer assistant
                  </button>
              </div>

      </form>

      <div style="margin: 10px;" id="loader" hidden>
          <div class="preloader-wrapper big active">
              <div class="spinner-layer spinner-blue-only">
                  <div class="circle-clipper left">
                      <div class="circle">  </div>
                  </div>
                  <div class="gap-patch">
                      <div class="circle">  </div>
                  </div>
                  <div class="circle-clipper right">
                      <div class="circle">  </div>
                  </div>
              </div>
          </div>
      </div>

    {{#if result}}
      <div style="width: 600px; margin-top: 30px;" id="resultContainer">
          <div class="row">
              <div class="col">
                  <label for="text">Result:  </label>
                  <div class="card blue-grey darken-1">
                      <div class="card-content white-text">
                          <p>{{result}}  </p>
                      </div>
                  </div>
              </div>
          </div>
      </div>
    {{/if}}
  </div>
This view now dynamically displays the conversation history, user input, loader animation, and the AI-generated result. It aligns with the changes made in the controller to integrate the qb-ai-answer-assistant library.
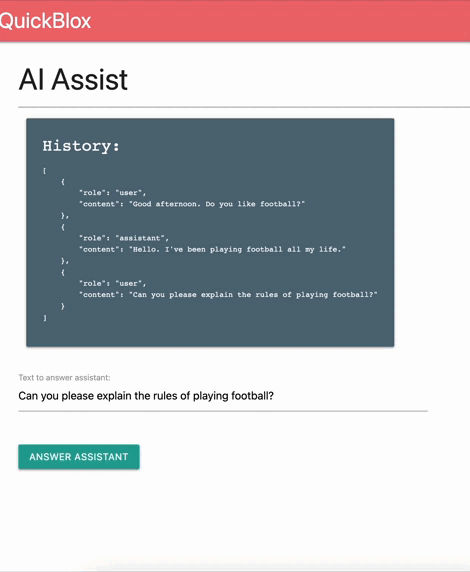
Now that we’ve integrated QuickBlox’s Answer Assistant, let’s test it out:
- Navigate to “AI Assist”: Go to the “AI Assist” section in your application’s navigation menu.
- Input a Phrase: In the provided text area, enter a phrase or question you’d like the AI to respond to.
- Generate AI Response: Click the “Answer Assistant” button to submit the input and generate a response.
- View Result: Explore the AI-generated response displayed on the page. The conversation history will capture the interaction.
This quick process allows you to experience firsthand how the Answer Assistant dynamically responds to user input, enhancing the interactive capabilities of your application.
Step 4: Integrate QuickBlox AI Translate
Update your controller file (translateController.js) to incorporate QuickBlox AI Translate functionality.
Here’s a simplified example of integrating Translate in translateController.js:
const QBAITranslate = require('qb-ai-translate').QBAITranslate;

history = [
    { role: "user", content: "Good afternoon. Do you like football?" },
    { role: "assistant", content: "Hello. I've been playing football all my life." }
];


textToTranslate = "Можешь, пожалуйста, объяснить правила игры в футбол?";

module.exports.aiCreateTranslate = async function (req, res) {
    try {
        const settings = QBAITranslate.createDefaultAITranslateSettings();
        settings.apiKey = 'YOUR_API_KEY';
        settings.model = 'gpt-3.5-turbo';
        settings.language = 'Ukrainian';
        settings.maxTokens = 3584;

        settings.language = (req.body.language) ? req.body.language : 'English';

        const result = await QBAITranslate.translate(req.body.text, history, settings);

        res.render('translate', {
            title: 'AI Translate',
            isTranslate: true,
            history: JSON.stringify(history, null, 4),
            textToTranslate,
            result
        });
    } catch (e) {
        res.render('translate', {
            title: 'AI Translate',
            isTranslate: true,
            history: JSON.stringify(history, null, 4),
            textToTranslate,
            result: 'Error translate'
        });
    }
}

module.exports.showFormTranslate = async function (req, res) {
    res.render('translate', {
        title: 'AI Translate',
        isTranslate: true,
        history: JSON.stringify(history, null, 4),
        textToTranslate,
    });
}
This code incorporates the qb-ai-translate library for AI translation. The essential points are:
Translation Settings:
- It sets up translation settings such as API key, model, language, and maximum tokens.
Translation Function:
- The aiCreateTranslate function handles user requests for translation.
- It utilizes the QBAITranslate.translate method to generate AI-translated results based on user input.
- The translated output, conversation history, and other details are rendered in the ‘translate’ view.
Error Handling:
- In case of errors during translation, the code gracefully handles them and renders the ‘translate’ view with an error message.
Rendering Initial View:
- The showFormTranslate function renders the ‘translate’ view with the initial conversation history, preparing the interface for user interaction.
We must update the view in file translate.hbs:
<h3>{{title}}</h3>
<hr>
<div id="ai-translate" style="height: 300px; width: 400px;">
    <form action="/ai-translate" method="post">
        <div style="width: 600px; font-family: monospace; font-size: xx-small;">
            <div class="row">
                <div class="col">
                    <div class="card blue-grey darken-1">
                        <div class="card-content white-text">
                            <span class="card-title">History: </span>
                            <p>
                            <pre>{{history}}</pre>
                            </p>
                        </div>
                    </div>
                </div>
            </div>
        </div>

        <div>
            <label>Browser Select</label>
            <select class="browser-default" name="language" required>
                <option value="English" selected>English</option>
                <option value="Spanish">Spanish</option>
                <option value="French">French</option>
                <option value="Portuguese">Portuguese</option>
                <option value="German">German</option>
                <option value="Ukrainian">Ukrainian</option>
            </select>
        </div>

        <div class="input-field col s12">

            <div class="row">
                <div class="input-field col s12">
                    <textarea id="text" name="text" class="materialize-textarea" required>{{textToTranslate}}</textarea>
                    <label for="text">Text to translate:</label>
                </div>
            </div>

            <div>
                <button class="btn waves-effect waves-light" type="submit" name="action" value="translate" id="submit">
                    Translate
                </button>
            </div>

    </form>

    <div style="margin: 10px;" id="loader" hidden>
        <div class="preloader-wrapper big active">
            <div class="spinner-layer spinner-blue-only">
                <div class="circle-clipper left">
                    <div class="circle"></div>
                </div>
                <div class="gap-patch">
                    <div class="circle"></div>
                </div>
                <div class="circle-clipper right">
                    <div class="circle"></div>
                </div>
            </div>
        </div>
    </div>

    {{#if result}}
    <div style="width: 600px; margin-top: 30px;" id="resultContainer">
        <div class="row">
            <div class="col">
                <label for="text">Result:</label>
                <div class="card blue-grey darken-1">
                    <div class="card-content white-text">
                        <p>{{result}}</p>
                    </div>
                </div>
            </div>
        </div>
    </div>
    {{/if}}
</div>
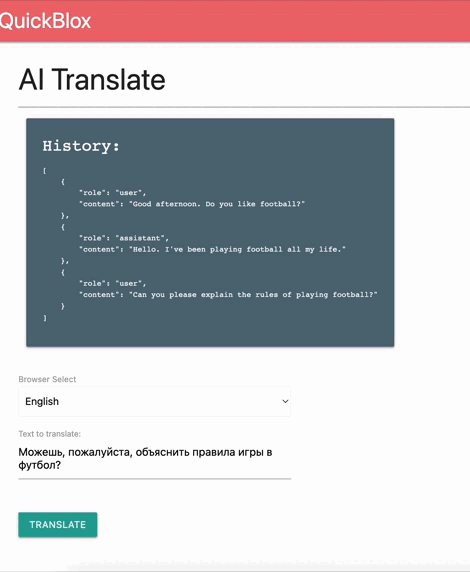
After the recent changes, let’s quickly navigate to the “AI Translate” section in our app’s menu. There, we’ll input text for translation, choose the target language, and generate the translated output.
Step 5: Integrate QuickBlox AI Rephrase
Update your controller file (rephraseController.js) to incorporate QuickBlox AI Rephrase functionality.
Here’s a simplified example of integrating Rephrase in rephraseController.js:
const QBAIRephrase = require('qb-ai-rephrase').QBAIRephrase;

history = [
    { role: "user", content: "Good afternoon. Do you like football?" },
    { role: "assistant", content: "Hello. I've been playing football all my life." },
    { role: "user", content: "Can you please explain the rules of playing football?"}
];

tones = [
    {
      name: 'Professional Tone',
      description:
        'This would edit messages to sound more formal, using technical vocabulary, clear sentence structures, and maintaining a respectful tone. It would avoid colloquial language and ensure appropriate salutations and sign-offs',
      iconEmoji: '?',
    },
    {
      name: 'Friendly Tone',
      description:
        'This would adjust messages to reflect a casual, friendly tone. It would incorporate casual language, use emoticons, exclamation points, and other informalities to make the message seem more friendly and approachable.',
      iconEmoji: '?',
    },
    {
      name: 'Encouraging Tone',
      description:
        'This tone would be useful for motivation and encouragement. It would include positive words, affirmations, and express support and belief in the recipient.',
      iconEmoji: '?',
    },
    {
      name: 'Empathetic Tone',
      description:
        'This tone would be utilized to display understanding and empathy. It would involve softer language, acknowledging feelings, and demonstrating compassion and support.',
      iconEmoji: '?',
    },
    {
      name: 'Neutral Tone',
      description:
        'For times when you want to maintain an even, unbiased, and objective tone. It would avoid extreme language and emotive words, opting for clear, straightforward communication.',
      iconEmoji: '?',
    },
    {
      name: 'Assertive Tone',
      description:
        'This tone is beneficial for making clear points, standing ground, or in negotiations. It uses direct language, is confident, and does not mince words.',
      iconEmoji: '?',
    },
    {
      name: 'Instructive Tone',
      description:
        'This tone would be useful for tutorials, guides, or other teaching and training materials. It is clear, concise, and walks the reader through steps or processes in a logical manner.',
      iconEmoji: '?',
    },
    {
      name: 'Persuasive Tone',
      description:
        'This tone can be used when trying to convince someone or argue a point. It uses persuasive language, powerful words, and logical reasoning.',
      iconEmoji: '☝️',
    },
    {
      name: 'Sarcastic/Ironic Tone',
      description:
        'This tone can make the communication more humorous or show an ironic stance. It is harder to implement as it requires the AI to understand nuanced language and may not always be taken as intended by the reader.',
      iconEmoji: '?',
    },
    {
      name: 'Poetic Tone',
      description:
        'This would add an artistic touch to messages, using figurative language, rhymes, and rhythm to create a more expressive text.',
      iconEmoji: '?',
    },
  ];

const getToneByName = (toneName) => {
    let tone = tones[0];

    if (toneName) {
        for (let index = 0; index < tones.length; index++) {
            if (tones[index].name === toneName) {
                tone = tones[index];
                break;
            }
        }
    }

    if (tone === undefined)
      tone = tones[0];

    return tone;
}

textToRephrase = "Sure! In football, two teams of 11 players each try to score goals by getting the ball into the opposing team's net. Players can pass, dribble, or shoot the ball to move it around the field. The team with the most goals at the end of the game wins.";


module.exports.aiCreateRephrase = async function (req, res) {
    try {
        const settings = QBAIRephrase.createDefaultAIRephraseSettings();
        settings.apiKey = 'YOUR_API_KEY';
        settings.model = 'gpt-3.5-turbo';
        settings.tone = tones[0]; //Professional Tone
        settings.maxTokens = 3584;

        settings.tone = getToneByName(req.body.tone);

        const result = await QBAIRephrase.rephrase(req.body.text, history, settings);

        res.render('rephrase', {
            title: 'AI Rephrase',
            isRephrase: true,
            history: JSON.stringify(history, null, 4),
            textToRephrase,
            tones,
            result
        });
    } catch (e) {
        res.render('rephrase', {
            title: 'AI Rephrase',
            isRephrase: true,
            history: JSON.stringify(history, null, 4),
            textToRephrase,
            tones,
            result: 'Error rephrase'
        });
    }
}


module.exports.showFormRephrase = async function (req, res) {
    res.render('rephrase', {
        title: 'AI Rephrase',
        isRephrase: true,
        history: JSON.stringify(history, null, 4),
        textToRephrase,
        tones
    });
}
This code integrates the qb-ai-rephrase library for AI text rephrasing. Key elements include:
Rephrasing Settings:
- It sets up settings such as API key, model, tone (defaulting to Professional), and maximum tokens.
Tone Options:
- Defines various tone options with corresponding descriptions and emojis.
Tone Retrieval Function:
- The getToneByName function retrieves the tone based on the given name or defaults to Professional.
Initial Text for Rephrasing:
- It provides a sample text to be used for rephrasing.
Rephrase Function:
- The aiCreateRephrase function handles user requests for text rephrasing.
- It utilizes the QBAIRephrase.rephrase method to generate AI-rephrased results based on user input.
- The rephrased output, conversation history, tone options, and other details are rendered in the 'rephrase' view.
Error Handling:
- In case of errors during rephrasing, the code gracefully handles them and renders the 'rephrase' view with an error message.
Rendering Initial View:
- The showFormRephrase function renders the 'rephrase' view with the initial conversation history, sample text, and tone options, preparing the interface for user interaction.
We must update the view in file rephrase.hbs:
<h3>{{title}}</h3>
<hr>
<div id="ai-rephrase" style="height: 300px; width: 600px;">
  <form action="/ai-rephrase" method="post">
    <div style="width: 600px; font-family: monospace; font-size: xx-small;">
      <div class="row">
        <div class="col">
          <div class="card blue-grey darken-1">
            <div class="card-content white-text">
              <span class="card-title">History: </span>
              <p>
              <pre>{{history}}</pre>
              </p>
            </div>
          </div>
        </div>
      </div>
    </div>

    <div>
      <label>Browser Select Tone</label>
      <select class="browser-default" name="tone" required>
        {{#each tones}}
         <option value="{{this.name}}" >{{iconEmoji}} {{this.name}}</option>
        {{/each}}
      </select>
    </div>

    <div class="input-field col s12">

      <div class="row">
        <div class="input-field col s12">
          <textarea id="text" name="text" class="materialize-textarea" required>{{textToRephrase}}</textarea>
          <label for="text">Text to Rephrase:</label>
        </div>
      </div>


      <div>
        <button class="btn waves-effect waves-light" type="submit" name="action" value="Rephrase" id="submit">
          Rephrase
        </button>
      </div>

  </form>

  <div style="margin: 10px;" id="loader" hidden>
    <div class="preloader-wrapper big active">
      <div class="spinner-layer spinner-blue-only">
        <div class="circle-clipper left">
          <div class="circle"></div>
        </div>
        <div class="gap-patch">
          <div class="circle"></div>
        </div>
        <div class="circle-clipper right">
          <div class="circle"></div>
        </div>
      </div>
    </div>
  </div>

  {{#if result}}
  <div style="width: 600px; margin-top: 30px;" id="resultContainer">
    <div class="row">
      <div class="col">
        <label for="text">Result:</label>
        <div class="card blue-grey darken-1">
          <div class="card-content white-text">
            <p>{{result}}</p>
          </div>
        </div>
      </div>
    </div>
  </div>
  {{/if}}
</div>
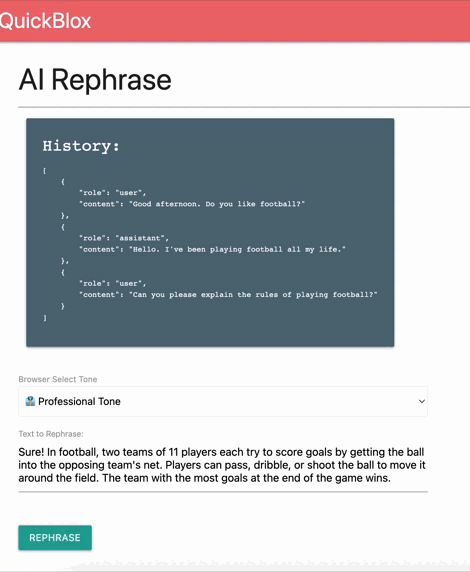
After the recent updates, let's swiftly navigate to the "AI Rephrase" section in our app's menu. There, we'll input text for rephrasing, select a tone, and generate the AI-generated rephrased output.
Conclusion
Well done! You have now successfully integrated QuickBlox's JavaScript AI libraries, — QBAIAnswerAssistant, QBAITranslate, and QBAIRephrase — into your web application.
We would love to learn about what you build. Please consider joining our QuickBlox Developer Discord community where you can share your ideas and seek support.
The source code of the application featured in the article is available in the QuickBlox Github repository.
Happy coding !
Have Questions? Need Support?
Join the QuickBlox Developer Discord Community, where you can share ideas, learn about our software, & get support.
Join QuickBlox Discord
 AI Agent — automate conversations and workflows. Now available on Free plan