In our previous blog we told you about the great new AI Answer Assist functionality we’ve added to our Android UI Kit. We can now update you that AI Answer Assist for Android is now available as a standalone feature that can be added to any Android app!
AI Answer Assist enables app users to quickly access reliable and relevant answers to customer queries during an online chat. Powered by OpenAI GPT, Answer Assist provides contextually relevant information in real-time, and can now be easily added to any chat app to serve countless business use cases. It’s guaranteed to lead to Android app user experience enhancement!
QuickBlox is dedicated to creating tools that make it effortless for developers to integrate cutting edge features into their apps. Read on to learn how you can empower your Android app with Answer Assistance.
In the following tutorial we outline two approaches to implementing Android in-app AI Assistance:
I. Install our Android AI Answer Assist Library (QBAIAnswerAssistant) within your existing Android project
II. Utilize our Android UI Kit which already includes AI Answer Assist
II. Using the Android AI Answer Assistant Library
The QuickBlox AI Android Library has been designed for developers of all levels of experience wishing to build AI-powered Android apps. Its main purpose is to facilitate communication between end developers and the OpenAI API. The new Answer Assist feature optimizes all the routine work with the API, allowing developers to simply call one method and receive the answer they need. The library analyzes the chat conversation history and suggests the most optimal answers based on the content of all the messages exchanged.
How it works
Let’s take a closer look at how this works.
To utilize the QuickBlox Answer Assistant library, we only need to follow a few simple steps.
- Add the repository
- Add dependency
- Invoke Entry Point
Step 1. Add the repository
First of all, you need to add the repository to the existing Android application. You need to open the gradle (root level) file and add the code, as illustrated in the code snippet below. See the dependencyResolutionManagement section in particular.
dependencyResolutionManagement {
    repositoriesMode.set(RepositoriesMode.FAIL_ON_PROJECT_REPOS)
    repositories {
        google()
        mavenCentral()

      	// below we have the a link to QuickBlox AI repository
        maven {
            url= "https://github.com/QuickBlox/public-ai-releases"
        }
    }
}
Step 2. Add the dependency
Next, you need to add a dependency to the existing Android application. You need to open the gradle(application level) file and add the code, as illustrated in the snippet below. See the dependencies section.
dependencies {
    // some other dependencies

    // below we have a link to QuickBlox AI Answer assistant library
    implementation "com.quickblox:android-ai-answer-assistant:2.0.0"
}
Version 2.0.0 can be changed according to the latest release. You can discover the latest release and the entire release history in our repository: https://github.com/QuickBlox/android-ai-releases/releases
Step 3. Invoke entry point
There are two approaches for using the QuickBlox Answer Assist library.
Directly: Using the library with raw Open AI token. Of course, the token should be hidden with the best approach. For example, add the token to the local.properties file. The library will communicate directly with OpenAI API. This is not the preferred method because we are using an Open AI token directly. It’s a good solution for the development flow because you can quickly test the necessary functionality without spending time to roll out the proxy server. However, it’s not suitable for the release.
Proxy: Using the library with QuickBlox session token and with a proxy server. The library will communicate through a proxy server (not directly) with OpenAI API. This is the preferred secure method because we encapsulate the Open AI token inside the proxy server. It’s a good solution for the release flow.
1. Direct Method
To invoke the QuickBlox answer assistant library method you need to add necessary imports and invoke the createAnswerAsync method like in the code snippet below.
// some other imports

// below we have required imports for QuickBlox answer assistant library
import com.quickblox.android_ai_answer_assistant.QBAIAnswerAssistant
import com.quickblox.android_ai_answer_assistant.callback.Callback
import com.quickblox.android_ai_answer_assistant.exception.QBAIAnswerAssistantException
import com.quickblox.android_ai_answer_assistant.message.Message
import com.quickblox.android_ai_answer_assistant.settings.AnswerAssistantSettingsImpl
import com.quickblox.android_ai_answer_assistant.settings.AnswerAssistantSettingsImpl.Model


/*
 * some code
 */

fun createAnswerWithApiKey() {
   val openAIToken = "open_ai_token" // our raw open ai token
   val answerAssistantSettings = AnswerAssistantSettingsImpl(openAIToken)

   // optional parameters
   val maxRequestTokens = 3000 // default value
   val openAIModel = Model.GPT_3_5_TURBO // default value
   val temperature = 0.5f // default value

   answerAssistantSettings.setMaxRequestTokens(maxRequestTokens)
   answerAssistantSettings.setModel(openAIModel)
   answerAssistantSettings.setTemperature(temperature)

   val messages = mutableListOf() // messages history

   QBAIAnswerAssistant.createAnswerAsync(messages, answerAssistantSettings, object : Callback {
       override fun onComplete(answer: String) {
           // here will be result as list of answers
       }
       override fun onError(exception: QBAIAnswerAssistantException) {
           // oops, something goes wrong
       }
   })
}
2. Proxy Method
To invoke the QuickBlox answer assistant library method you need to add necessary imports and invoke the createAnswerAsync method like in the code snippet below.
// some other imports

// below we have required imports for QuickBlox answer assistant library
import com.quickblox.android_ai_answer_assistant.QBAIAnswerAssistant
import com.quickblox.android_ai_answer_assistant.callback.Callback
import com.quickblox.android_ai_answer_assistant.exception.QBAIAnswerAssistantException
import com.quickblox.android_ai_answer_assistant.message.Message
import com.quickblox.android_ai_answer_assistant.settings.AnswerAssistantSettingsImpl
import com.quickblox.android_ai_answer_assistant.settings.AnswerAssistantSettingsImpl.Model


/*
 * some code
 */

fun createAnswerWithProxyServer() {
   val qbToken = "quickblox_token" // our QuickBlox session token
   val serverProxyUrl = "https://my.proxy-server.com" // our proxy server url
   val answerAssistantSettings = AnswerAssistantSettingsImpl(qbToken, serverProxyUrl)

   // optional parameters
   val maxRequestTokens = 3000 // default value
   val openAIModel = Model.GPT_3_5_TURBO // default value
   val temperature = 0.5f // default value

   answerAssistantSettings.setMaxRequestTokens(maxRequestTokens)
   answerAssistantSettings.setModel(openAIModel)
   answerAssistantSettings.setTemperature(temperature)

   val messages = mutableListOf() // messages history

   QBAIAnswerAssistant.createAnswerAsync(messages, answerAssistantSettings, object : Callback {
       override fun onComplete(answer: String) {
           // here will be result as list of answers
       }
       override fun onError(exception: QBAIAnswerAssistantException) {
           // oops, something goes wrong
       }
   })
}
We recommended using our proxy server which you can find in our GitHub repository. Please use the latest release.
Message Types and Message History
There are two types of messages, OtherMessage and MeMessage. Both messages inherited the Message interface
- OtherMessage – the message from the opponent who we chat with.
- MeMessage – the message we create. The creator of OwnerMessage is the one who will send answers using the QuickBlox Answer Assist library.
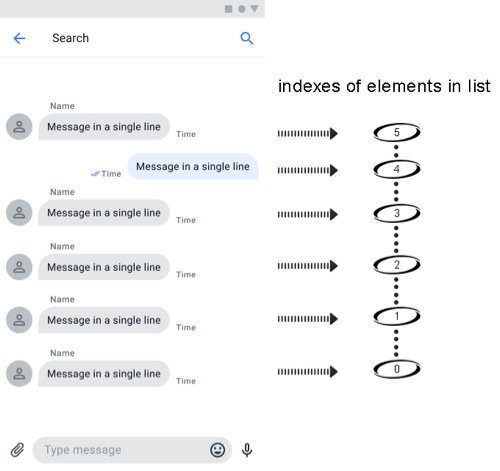
We need to pass the message history as a List where the messages were added in ascending type. The first element in the list should be the last received message. Best practice is to use the last message from an opponent, it will be the first element of our messages chain List. In the picture below we have an example of the message order.
You need to create a list of Message interfaces by MeMessage and OtherMessage models (implementation Message interface), as shown in the code snippet below with chat history.
private fun generateMessageHistory(): List {
    val messages = mutableListOf()
    // it's our last message, will be insert with index 0

    messages.add(MeMessage("Hi. let me check..."))
    // it's last message from opponent, will be insert with index 1

    messages.add(OtherMessage("Can we have a call today evening?"))
    // it's message from opponent, will be insert with index 2

    messages.add(OtherMessage("I've a question about your job"))

    // it's message from opponent, will be insert with index 3
    messages.add(OtherMessage("How are you?"))

    // it's our message, will be insert with index 4
    messages.add(MeMessage("Hello"))

    // it's first message from opponent, will be insert with index 5
    messages.add(OtherMessage("Hello"))

    return messages
}
Exception
In the QuickBlox Answer Assistant library you could receive QBAIAnswerAssistantException in onError callback. You can get detailed information from the message field, as shown in the code snippet below.
override fun onError(error: QBAIAnswerAssistantException) {
                val detailMessage = error.message
                // show message to UI or another logic
}
You can find examples of this implementation in the QuickBlox UI Kit by following the link in GitHub.
II. Using AI Answer Assist with Android UI Kit
To save time when developing a chat app for Android you may want to use the Android UI Kit. One added advantage of this UI Kit is that it has already been set up for Answer Assist functionality. To get started, follow the simple steps outlined below.
Step 1. Add the repository and dependencies
First of all, you need to add the repository to existing Android application. You need to open the gradle (root level) file and add the code like in the snippet below in dependencyResolutionManagement section.
dependencyResolutionManagement {
    repositoriesMode.set(RepositoriesMode.FAIL_ON_PROJECT_REPOS)
    repositories {
        google()
        mavenCentral()
maven {
            url "https://github.com/QuickBlox/android-ui-kit-releases/raw/master/"
   	 }
    	maven {
            url "https://github.com/QuickBlox/quickblox-android-sdk-releases/raw/master/"
    	}

      	// below we have the a link to QuickBlox AI repository
        maven {
            url= "https://github.com/QuickBlox/public-ai-releases"
        }
    }
}
Next, you need to add a dependency to your existing Android application. You need to open the gradle(application level) file and add the code like in the snippet below in the dependencies section.
dependencies {
    implementation "com.quickblox:android-ui-kit:0.7.0"
    // some another dependencies
}
Version 0.7.0 can be changed according to the latest release. You can discover the latest release and the entire release history in our repository: https://github.com/QuickBlox/android-ai-releases/releases
Step 2. Enable/Disable AI Answer Assist
By default, AI Answer Assist is turned on, but not configured.
Disable AI Answer Assist
To disable AI Answer Assist we need to invoke method in the UI Kit entry point after we invoke init method.
Code snippet:
QuickBloxUiKit.init(applicationContext)
// below we disable the AI Answer Assistant
QuickBloxUiKit.disableAIAnswerAssistant()
Configure AI Answer Assist with OpenAI Token
To configure the AI Answer Assist by using the OpenAI Token, we need to invoke the following method in the UI Kit entry point after we invoke the init method.
Code snippet:
QuickBloxUiKit.init(applicationContext)

val openAIToken = "open_ai_token"
QuickBloxUiKit.enableAIAnswerAssistantWithOpenAIToken(openAIToken)
Configure AI Answer Assistant with Proxy server
To configure the AI Answer Assistant with the QuickBlox token we need to invoke the following method in the UI Kit entry point after we invoke init method.
Code snippet:
QuickBloxUiKit.init(applicationContext)

val serverProxyUrl = "https://my.proxy-server.com"
QuickBloxUiKit.enableAIAnswerAssistantWithProxyServer(serverProxyUrl)
Wrapping up: AI Integration Solutions from QuickBlox
By following these simple steps for adding Android App features with AI, you can elevate a standard chat app with cutting edge functionality that can be seamlessly integrated into communication solutions for various types of businesses, including medical consultations, online support services, and educational platforms. AI Answer Assist serves as an intelligent assistant, providing accurate and relevant answers and responses in any chat environment
The main idea behind the QuickBlox solution is to provide an incredibly simple and responsive mechanism for working with AI, tailored for developers of all levels. In our world, speed and efficiency are crucial. The QuickBlox Answer Assist library was created with this objective in mind, aligning with the goal of delivering prompt solutions for immediate use.
Learn more about, Getting Started with the QuickBlox Android UI Kit
Learn more about, How to Customize Color Theme and Screens in QuickBlox Android UI Kit
Interested in Android App Development with AI? Read our Implementation Guides for Android AI libraries:
AI Rephrase Implementation Guide for Android Apps
AI Translate Implementation Guide for Android Apps
Have Questions? Need Support?
Join the QuickBlox Developer Discord Community, where you can share ideas, learn about our software, & get support.
Join QuickBlox Discord
 AI Agent — automate conversations and workflows. Now available on Free plan